 SHOPPING CART
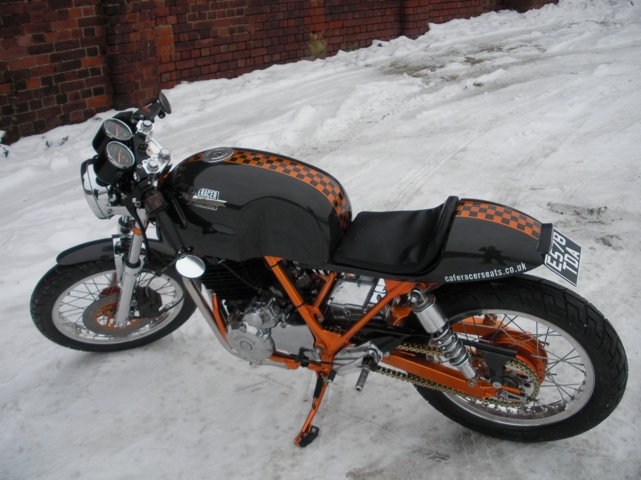
This Honda XBR500 was originally started as a request from a customer that asked us to build his bike.
The only stipulations we had were –
- It’s road legal
- The build is done on a budget
- It’s done in 2 months with MOT!
Given that they were our only stipulations, we could literally do whatever we liked with this little beauty.
Before it came to us, someone had already attempted to make it a Cafe Racer style bike and had failed miserably. It looked more like a Street Fighter than a Cafe Racer!
It came to us looking like this….

The first thing we did was get the Honda XBR500 running. We put fresh fuel in the Small Tank that we use when building any bike, connected a charged Battery, pulled the Choke on and pressed the Start Button with not much hope. To our surprise, it proved us wrong! First time of trying and it turned over, fired up and was ticking over smoothly till warm then ran perfectly off the choke. We prayed that the rest of the build was going to be this easy!!
We then had a play around with the style we wanted the bike.

At this stage, we had the style of the bike sorted and the build was on!! A few hours later, the Honda XBR500 was just a pile of bits.

After some thinking, we decided on the colour of the bike.
The Tank, Seat and Mudguard all Black/Grey (Carbon Fibre) with the Frame and the Decals down the centre of the Mudguard, Tank and Seat in Candy Fools Gold.
The build was now in full swing!!
As the Honda XBR500 was completely stripped down, we cut off all the unwanted Brackets, the Main Stand and the Subframe. We then welded some small gussets in the triangulated part where the Side Panels went and a bar where the Subframe was cut back (to mount the Light and Number Plate Bracket) before sending the Frame and Swinging Arm off to the Sand Blasters.
Over the couple of days that the Frame was away, we cleaned and de-greased the engine giving the Rocker Cover a quick polish with the Wire Brush on the Drill. The Covers were then sent off to the Polisher and all the little Brackets were painted.
We got the Frame Acid Etched Primed and High Build Primed, but we wasn’t happy with a few imperfections in the finish so it was a bit more filling and flatting before the base coat could go on!

Then we found an old CB900F Disc laying around our Unit so we gave it a try.. it fitted and lined up perfectly!
We finished the flatting, filling and re-priming the Frame whilst waiting for a few things to be delivered such as, Stainless Bolts, K N Style Air Filter and the Exhaust. Then we got the Frame, Swinging Arm, Side Stand and Torque Arm in the Bright Base Coat Silver.


The rest of the Engine that wasn’t at the Polishers, including the Crank Cases were painted in Gloss Black Engine Enamel. All the Bolts/Nut were replaced with Stainless Allen Bolts.
Once the Frame had dried completely, we got the Frame and the Swinging Arm painted in the Candy Fool Gold Colour and lacquered with many coats of Clear Top Coat.
Everything was running really smoothly and the Honda XBR500 was coming together really lovely when…
The customer whose bike it were came in to see us. We assumed he was here to pay his Parts Bill as we had just sent it him. Instead, he came with the Kleenex Speech which went something like –
“I cannot afford to do this bike anymore (we had no where near exceeded his original budget), I’ve lost my job, my Girlfriend’s pregnant, my Car failed the MOT, someone drown my Goldfish and the Hamster died.” Although we did feel for him, we did explain how he couldn’t take the bike until he had paid for the Parts and Labour done so far. At this point, we thought we was in the middle of a really good project that was never to be finished.
UNTIL…
Being the kind Yorkshire Man I am, I offered the customer a small amount of cash and to let him off with what he owed us and much to our delight, he was back 15 minutes later with the Log Book – RESULT!
This took the pressure off a bit, but also raised the standards. We were no longer working to a budget, we no longer needed anybody else’s approval for anything, it was ours and we could what we wanted with it. So off we went to see the guy that does our Chroming with loads of bits to get this done properly!
Once that was sorted we then painted the Bottom Yoke, Torque Arm and Side Stand in Base Coat, Colour and Lacquer. Everything was started to go well again!

We decided to spend a couple of hours getting the engine built up, putting the Polished Cases on and changing every Bolt for a Stainless Allen Bolt.
All was looking good!

UNTIL..
Just as I was tightening the Genny Cover down, it all went pear shaped.. MASSIVELY!!
I used an Allen Bolt and Washer on the Genny Wire Retaining Clip Bolt, which must have been touching the Crank Case. I wouldn’t mind but i was hardly tightening it, never mind swinging on it like a bloody monkey!!!

After a bit of Black 2K Paint, this is what we ended up with.

Next challenge… making the Carbon Bodywork!


We were now on a hunt to try and find somebody to make us an offset Sprocket as it needed to be RS250 Mount 34t and roughly 8mm off the offset.
In the meantime, the new Engine Casing came back from the Polishers and went straight onto the Honda XBR500. After originally designing this bike with Carbon Tank, Seat and Mudguard, we decided to make the Chain Guard, Headlight Bowl and Fuse Box Cover Carbon aswell!
This week became a disaster!
We were now in the middle of August – Holiday Season! And for some reason, EVERYBODY that we needed that week, decided to be spiteful and go on Holiday!! The original 2 Month deadline was only a week away, and even though the bike was now ours and no longer the customers, I still wanted to get the bike done.
The guy that builds my Wheels went away so we was stuck without the Wheels for another week.
The Chromer went away for the week and he still had a few bits from the Honda XBR500 that we needed.
It only got worse..
- We started by putting the RS Rear Hub in the parts washer to get off all the solid grease. All was going well until a great chunk of Metal fell out around one of the Bearing Mounts. Then we noticed that one of the Cush Rubber Mounts had been glued back on. Into the Scrap Ally pile..
- We couldn’t find another RS Rear Hub or Wheel anywhere so we ended up buying a CB350f CB400f Wheel from the early 80’s – another £60.00 down!
- The Front Disc I had was warped so I had to buy new ones and have them delivered – more money!
- I then lost my Charger for my Camera (hence the lack of photos at this stage)
However, it wasn’t all bad. Some things went well..
- The new Wheel didn’t need any machining. The offset was perfect so we just had to make some Spacers
- Found a small company that was happy to make us the Sprocket for the CB Wheel in the XBR Pitch within 7 – 10 days at a fab price
- We managed to get the Front Hub spaced up and painted in the same colour as the Frame
- Bought new Braided Oil Lines – we found a place that was very good on price and fastened them to the Original Connector so it looked clean and new but standard
- The moulds for the Carbon bits were now finished and the Chain Guard was made
- Polished the Oil Tank and Breather and got that fitted in the Frame
- We shaved 2mm off the Caliper Carrier so that everything aligned and worked on the front
We were getting there slowly. Just needed a new charger for the camera!
We soon got back to it and decided to tackle the wiring – oh dear! It was a right mess, with lots of twisted wires in insulating tape. The indicator wires and relays were removed and relocated all the components under the Seat Hump. After many many hours, we got it all soldered with heat shrink over the joints and just about sorted it.

The Body Work was coming along nicely too. On to making the Wheel Spacers and collecting the Spoked Front Wheel and the Front Mudguard Brace from the Chromer. The Front end was finally coming together.


The Front Mudguard needed shortening by a couple of inches at the Front before Lacquering it.
We finally built it up as a fully rolling bike. All the Spacers were correctly sized, both Mudguards and the Chain Guard had been lacquered and the Inner Tank was fabricated. We got a quote from a so-called ‘friend’ for the Downpipes and he said £200!! Instead, we decided to let one of our lads have a go at cleaning and polishing them up.

Things went on hold for a while as we attended a Bike Show in Germany. Once back, Both Mudguards were lacquered and fitted, the Stainless Collector Box were fabricated, polished and fitted with our Complete Cafe Racer Megaphone Exhaust. We had some new Braided Oil Pipes made up to the Tank and Fitted them along with new O Rings. Then we started cutting the Backing Plates out for the Rearsets –
Still need to do the Wiring!


We FINALLY (8 hours in total) got the Electrics sorted!!
We got the new Gold O Ring, Chain and Carbon Chain Guard fitted then made the Carbon Number Plate and Rear Light Bracket. There was three bulbs constantly on, only half of the bulbs came on for the Brake Light, some LEDs were brighter than others, it was time to order a new one! So along with a new battery, we ordered the Rear Light.


Both side Rearsets were roughly cut out of Plate Ally and fitted with the Carbon Heel Guards.


We really wanted this Honda XBR500 finished. So, no rest for the wicked.. On with the painting!
First we applied the Silver Base Coat, then the Base Coat, then the Candy Fools Gold.


It was then an anxious wait till the next day to see how it had turned out!
After a quick flat, a good wipe, and a rub over with the Tank Cloth. It was time for more coats of 2 pack lacquer.


In between the numerous coats of Clear, we decided the Front Disc looked too bland. So we decided to drill it in a similar pattern to the standard XBR Disc

FINALLY!!
The Honda XBR500 is FINISHED!
Had it running, it started up with the second press of the Start Button. But WOW is it loud.. TOO LOUD!
It is ready for the upcoming Shows!
Follow the link below to see it in action!
https://www.youtube.com/watch?v=i4_amV1iT58


Cart